Discover the key differences between rack pulls and deadlifts. Learn which exercise suits your fitness goals for strength training and muscle gain.
![Rack Pulls vs Deadlifts Compared [Strength Showdown]](/_next/image?url=https%3A%2F%2Fwww.zing.coach%2Flibrary%2Frack-pulls-vs-deadlifts-preview.jpg&w=3840&q=75)
The deadlift is a classic compound exercise found in every weightlifter’s program. It’s highly effective, with a wide array of variations to keep training engaging and challenging. One variation that has gained attention in the rack pulls vs deadlifts debate in recent years is the rack pull.
Although both exercises in the rack pull vs deadlift comparison are compound movements, some consider the rack pull to be easier than the conventional deadlift… Are rack pulls harder than deadlifts? Well, both have their own advantages and disadvantages, and which you use depends on your fitness goals, the muscle groups you’d like to focus on, and your individual preferences.
But rack pull vs deadlift – is one better than the other? Read on to find out!
Key Takeaways
- Rack pulls are a variation of deadlifts with a reduced range of motion.
- Deadlifts start with the barbell on the ground, while rack pulls begin with the barbell elevated.
- Deadlifts extensively work the lower back, glutes, and hamstrings from the floor lift, while rack pulls focus more on upper back muscles.
- Rack pulls allow for lifting heavier weights than conventional deadlifts due to the mechanical advantage of the reduced range of motion.
- Deciding between rack pulls or deadlifts should be based on personal fitness goals, physical condition, and specific training requirements, with the possibility of integrating both into a balanced training regimen.
Rack Pulls: What are they?
The rack pull, also known as the rack deadlift, is one of several partial range of motion (PROM) variations for the conventional deadlift.
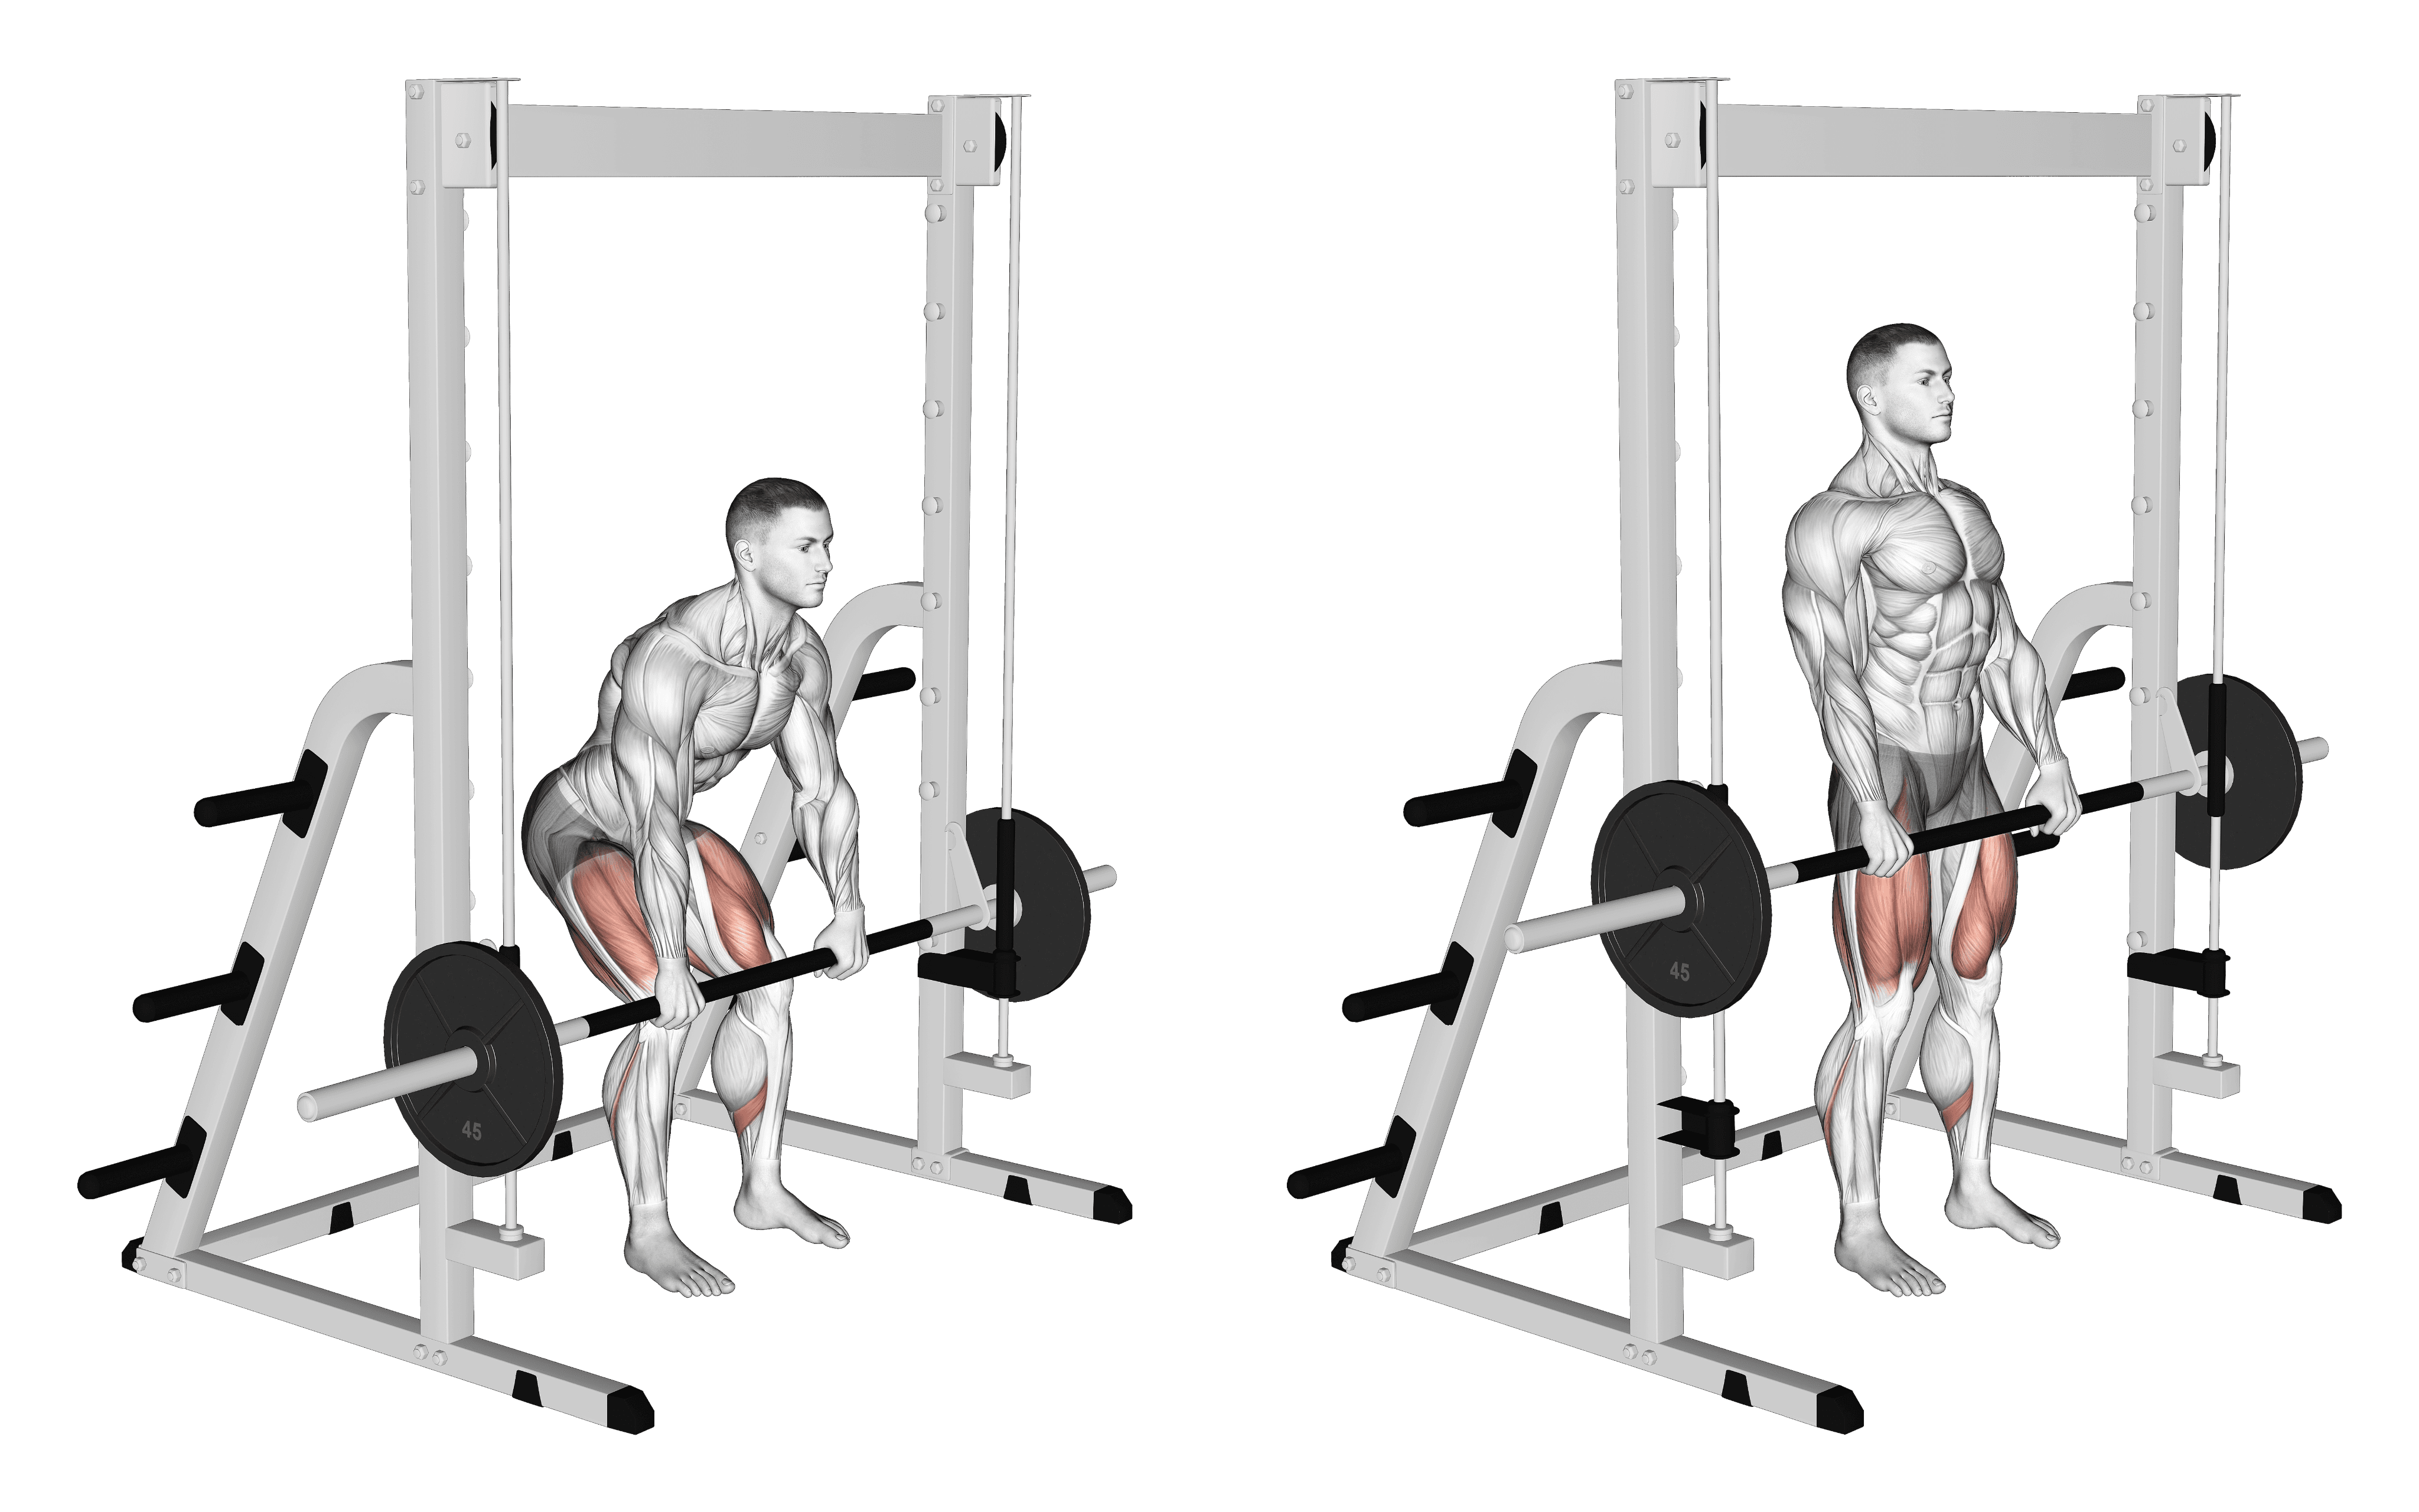
Why’s it called a “rack” pull? Instead of starting with the barbell resting on the ground as you would in a conventional deadlift, you start with the bar on the safety pins inside a power rack – a versatile piece of equipment that acts as a mechanical spotter (also known as a power cage, squat cage or squat rack) and is one of the best deadlift accessories you can use. The rack elevates the barbell to around knee height and prevents you from lowering it to the floor. This focuses the effort on the upper part of the deadlift’s range of motion.
Are rack pulls better than deadlifts? Well, the rack pull prioritizes heavier weight compared to a conventional deadlift, allowing you to “pull” significantly greater loads than you could lift when the barbell starts at ground height – almost 18% more, according to a 2022 study.
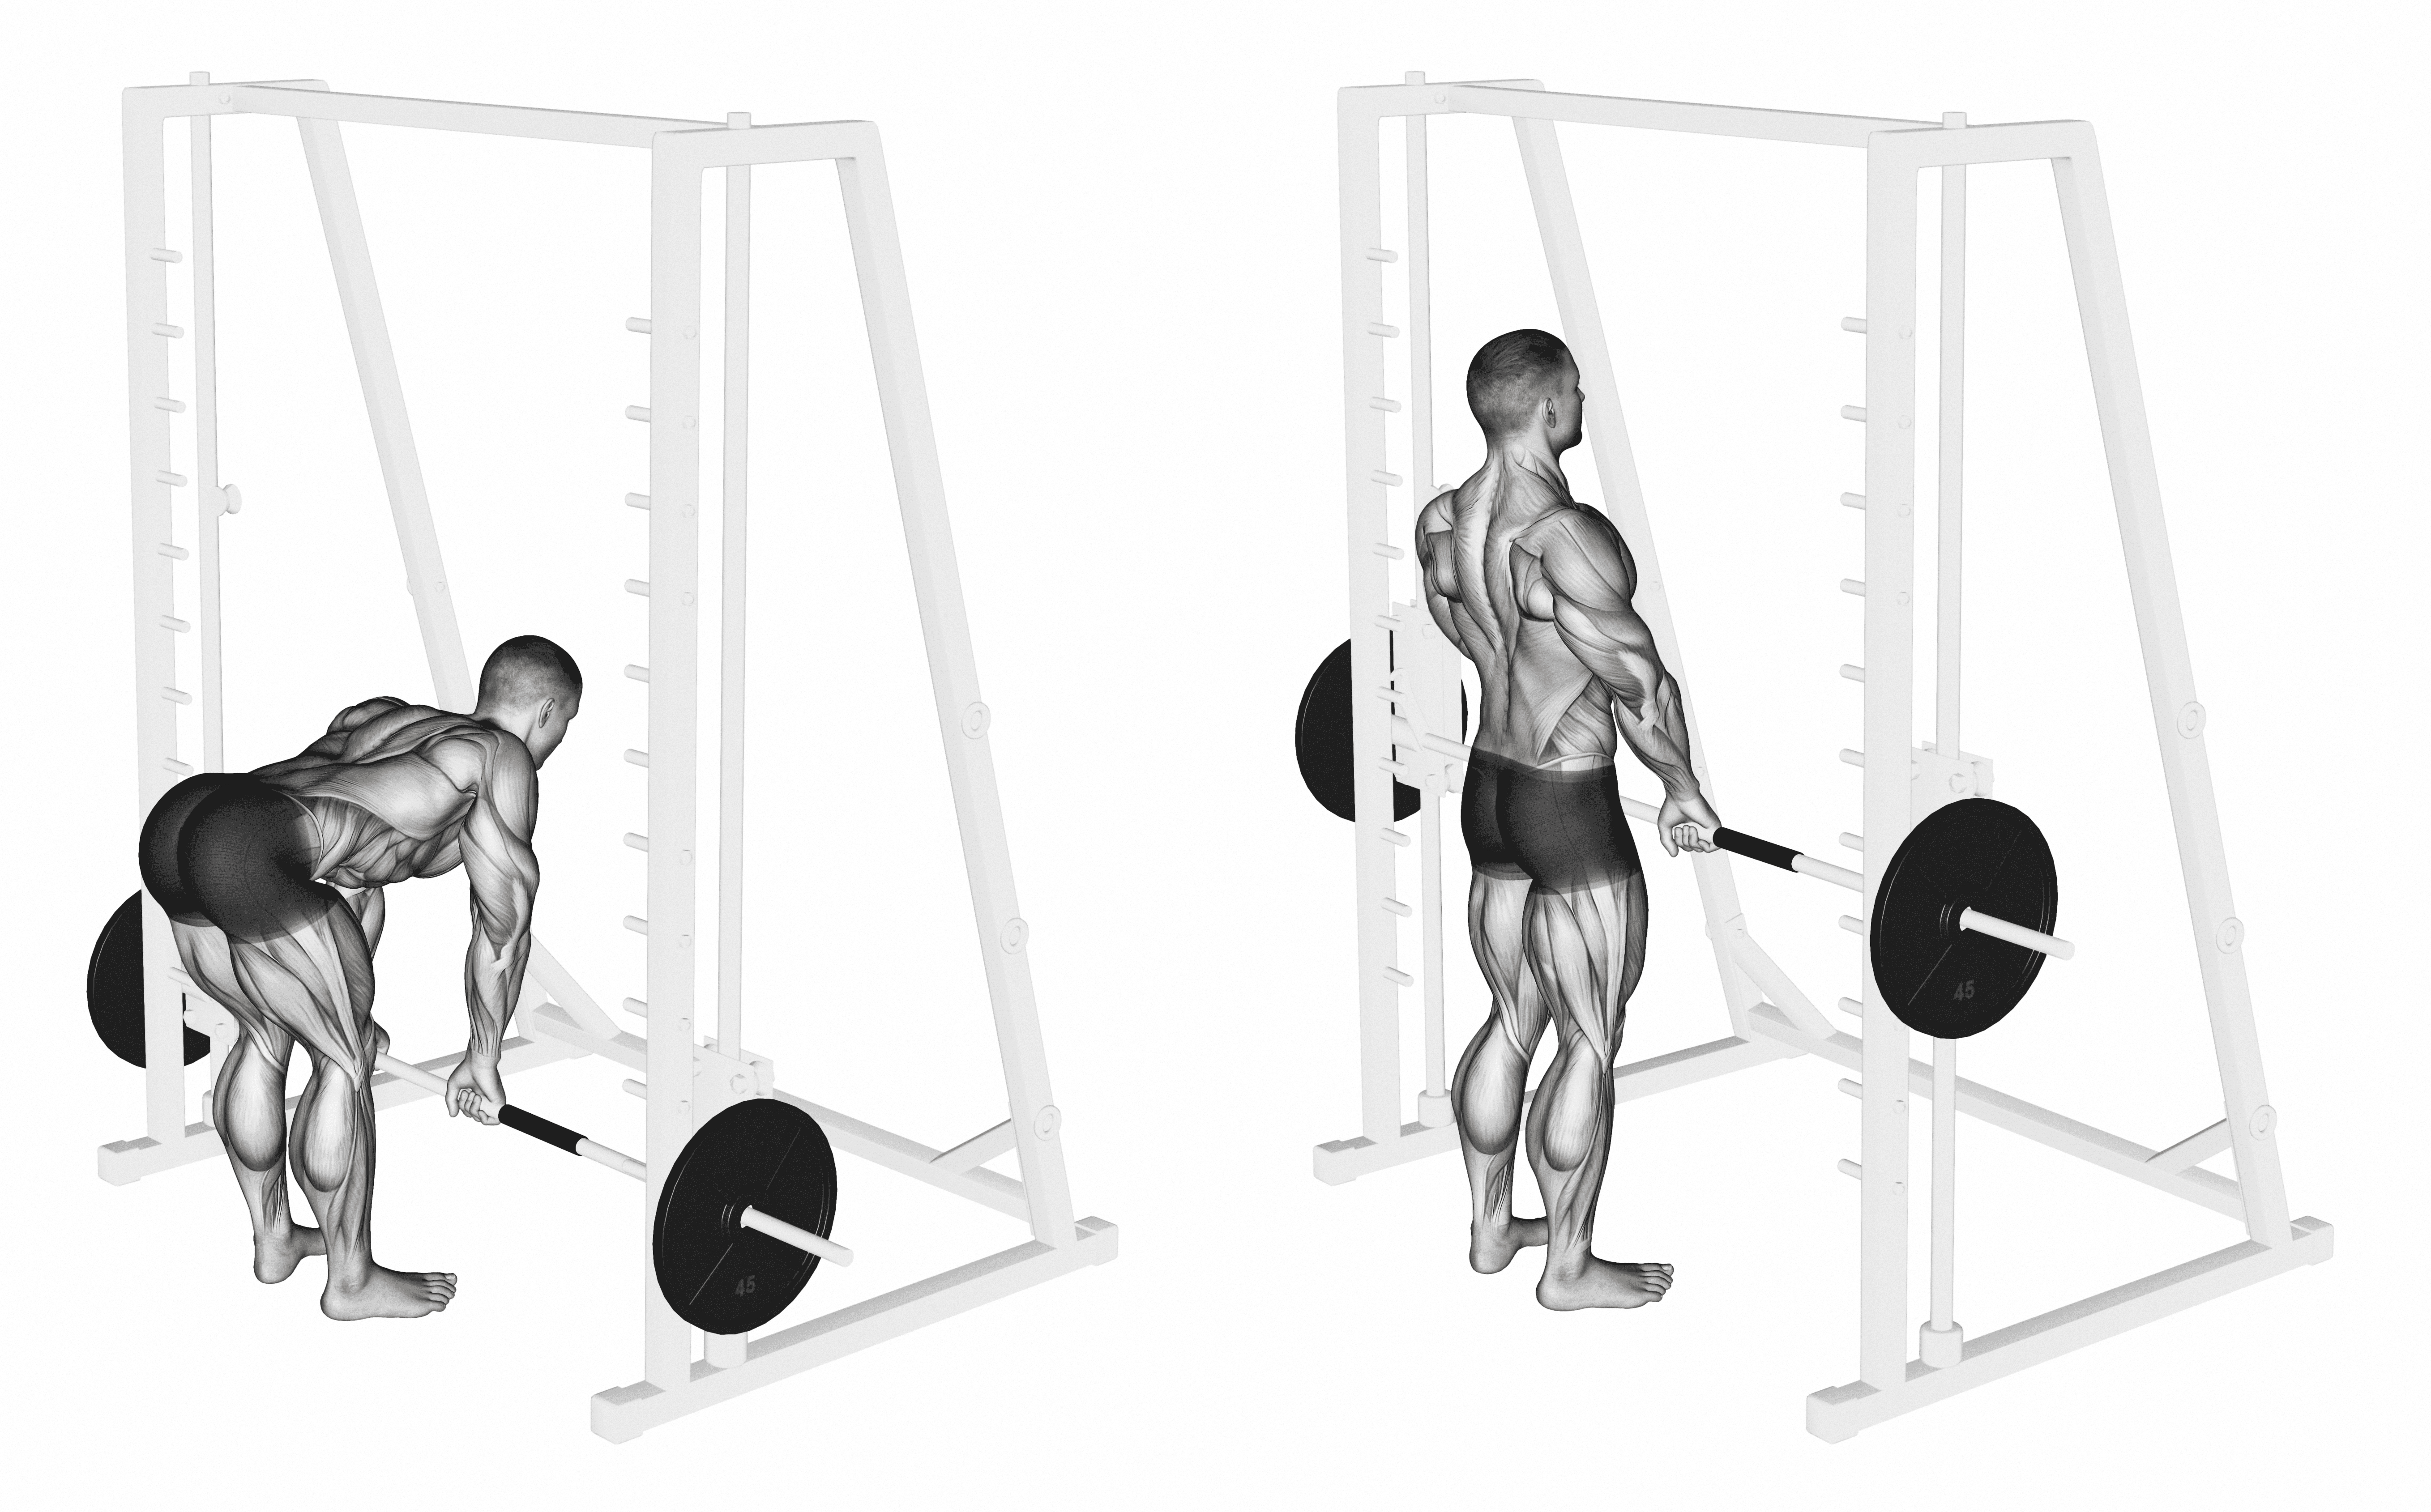
Muscles Worked in a Rack Pull
Because of the rack pull’s partial range of motion, it places slightly less emphasis on the legs and requires the back muscles to do more of the work. If you’re wondering about rack pulls or deadlifts for back strength, the answer is rack pulls.
So, what are the main muscles trained during rack pulls?
Upper Back
The latissimus dorsi, rhomboids, and trapezius work together to keep the barbell close to your body during the exercise.
Arms
Your forearm flexors (gripping muscles) are heavily involved as you hold onto the bar – especially since you often lift a heavier load than you would during a conventional deadlift. The biceps and triceps are also being put under isometric (static) tension.
Middle Back and Core
The erector spinae (muscles on either side of your spine) activate to extend the spine, more so if your torso is more bent over at the bottom half of the movement. Your core muscles should also be braced to protect your spine.
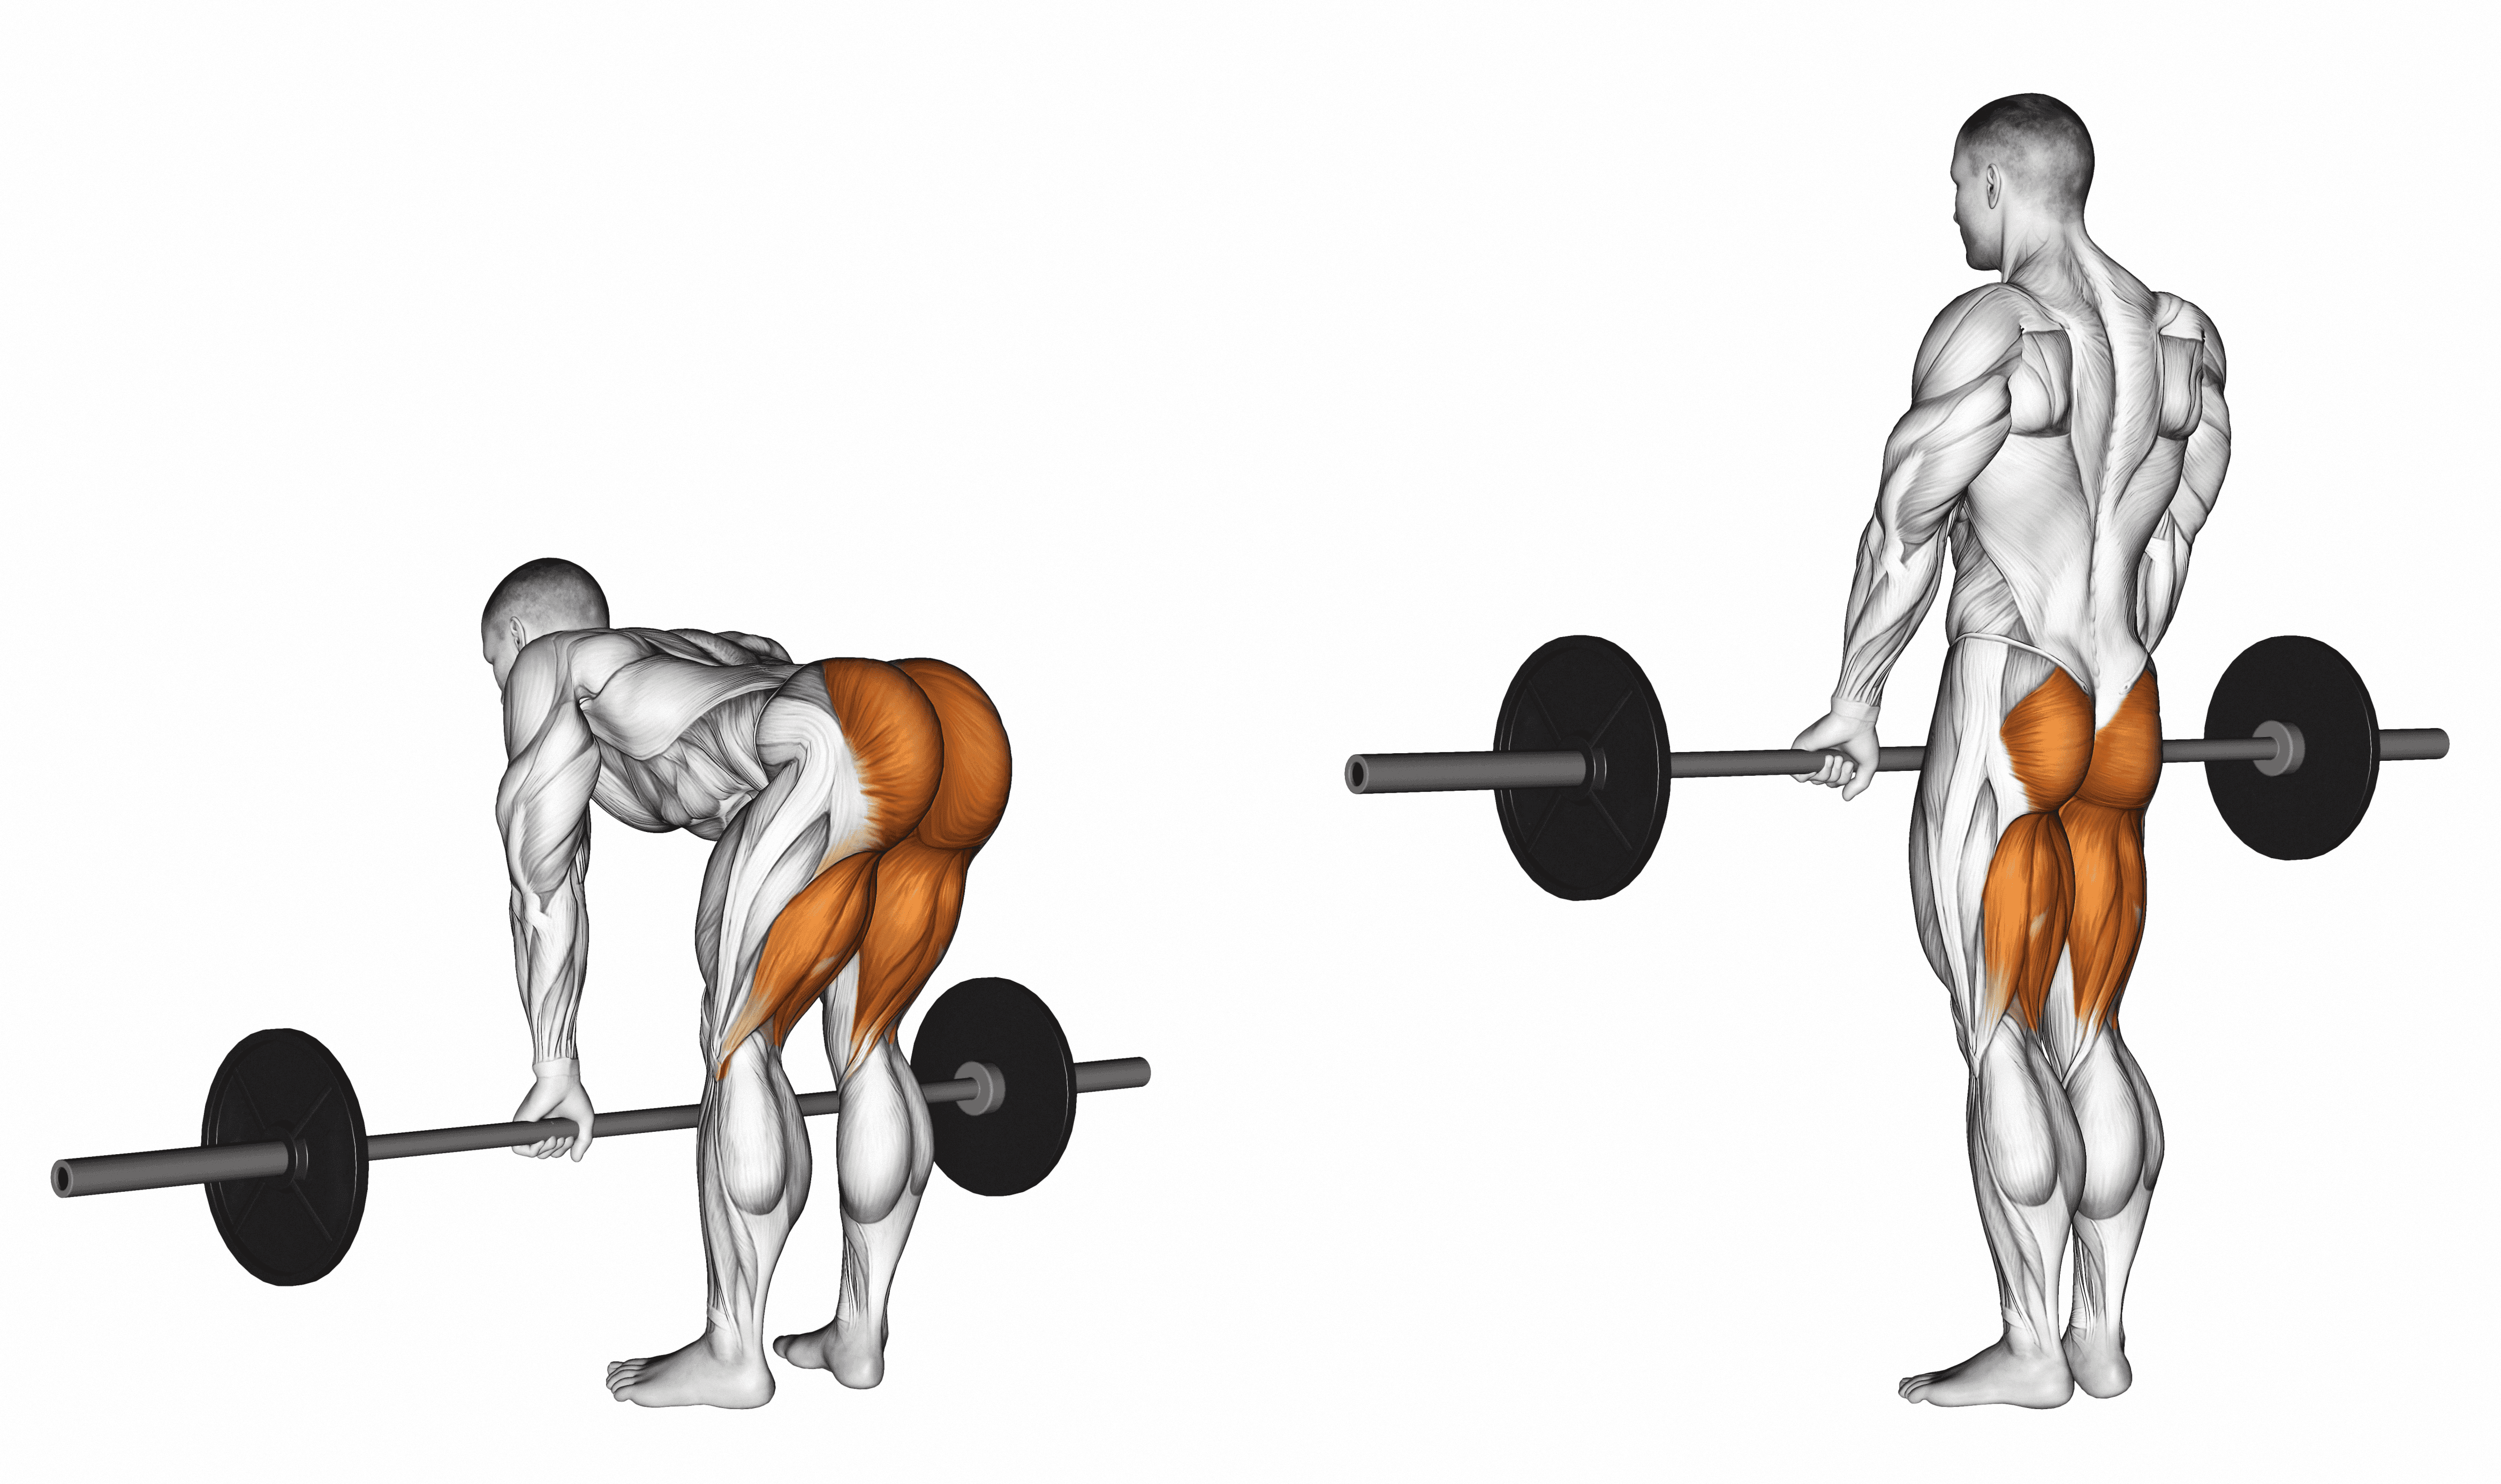
Buttocks
When considering rack pulls or deadlifts, the increased starting height reduces the knee extension, so the exercise primarily targets the gluteal muscles and adductor magnus muscles responsible for extending and stabilizing the hip joint.
Upper Legs
The reduced range of motion means that the hamstrings and quadriceps activate less than the other hip extensors. The lower the bar, the more they engage.
How to Do a Rack Pull Correctly
Rack pulls – like deadlifts – have 3 stages: the setup, drive, and lockout. Executing the movement with the correct form ensures you target the correct muscles and reduces your risk of injury.
The Setup
- Set the safety pins of the power rack to approximately knee height, then carefully position the unweighted bar on the pins. Only then should you add weight.
- Stand with your feet shoulder-width apart, toes pointed forward or slightly turned out.
- Center the bar over your feet with only a very small gap between the barbell and your shins.
- Position your shoulders slightly in front of the barbell or directly in line with it.
- Hinge at the hips and lower your upper body towards the bar, allowing a slight bend in your knees but without curving your spine.
- Keep your neck position neutral and your eyeline forward – imagine balancing a glass of water on your head.
- Grip the bar with your hands just outside your thighs, with either both palms facing backward (overhand grip) or one palm facing forwards and one palm facing backward (mixed grip).
The Drive
- Before you lift, tighten your grip, pull your shoulders back and down, and engage your lat muscles.
- Take a deep, diaphragmatic breath and feel your abdomen expand. This braces your core to stabilize your spine. Hold this brace throughout the lift to protect your lower back from injury.
- Lift the bar off the safety pins by driving through your heels, extending your hips and knees simultaneously while lifting your chest.
- As you lift, drive your hips toward the bar and keep the barbell close to your body.
- Keep your arms straight, your shoulders back, and your back muscles contracted.
The Lockout
- Lift to a standing position with your hips fully extended and your spine neutral.
- At the top of the movement, contract your glutes and upper back muscles, driving your shoulders backward.
- Hold that position for a moment, continuing to drive your hips into the bar.
- Exhale and reverse the same movement pattern, hinging your hips and bending the knees slightly to lower the bar to the starting position.
Ensure the barbell comes to a dead stop before beginning another repetition. Go through each of the setup steps – feet, legs, back, chest, arms and core – to ensure you maintain proper form.
Common Rack Pull Mistakes
Here are common rack pull mistakes to avoid:
Lifting Too Heavy, Too Soon
Ego lifting (compromising form for the sake of lifting heavier) can lead to injury. Just because you can lift heavier doesn’t mean you always should. You still risk injury by pushing yourself too hard. Progress gradually to heavier weights to allow your body to adapt, ensuring both strength and technique develop in harmony.
Not Using Wrist Protection
When lifting heavy weights, use wrist straps to protect your wrists. Loop one end through the other to create a loop, slip your hand through, tighten it, then wrap the strap's end around the bar several times. However, don’t allow your thoracic spine (upper back) to curve as a result of relying too much on the straps.
Knees Caving In
Keep your knees stable and aligned with your toes throughout the lift. The knees collapsing inward reduces the effectiveness of the lift and increases the risk of knee and lower back injuries.
Relaxing the Core Prematurely
Maintain a strong, braced core until the bar is safely back on the pins (even as you exhale) to protect your spine and enhance the lift's efficiency.
Hyperextending During Lockout
At the lockout phase, focus on standing tall with the chest up and shoulders back without pushing your hips too far forward or arching your back excessively.
Ignoring Lat Engagement
Failing to engage the lats can lead to a lack of stability in the upper body during the lift. Before lifting, actively pull your shoulder blades down and back to ‘lock’ your shoulders in place, creating a solid platform from which to lift.
Benefits of Rack Pulls vs Deadlifts
In the battle of deadlifts vs rack pulls, rack pulls offer some distinct advantages over conventional deadlifts.
Lifting Heavier
Due to the reduced range of motion, the elevated starting of the rack pull allows you to lift heavier weights by removing the effort from the quadriceps and lower back to break the weight from the floor. The lifter’s hips start closer to the bar, offering a mechanical advantage that reduces the moment arm and the torque – and therefore effort – required to lift the weight. Just remember to do so carefully, as the heavier weight can be an injury risk if something goes wrong.
Increasing Back Strength
One of the benefits of rack pulls vs deadlifts is that training with heavier weights than usually possible with conventional deadlifts creates progressive overload which causes the central nervous system to recruit more muscle fibers, resulting in strength gains in the muscles directly involved in the lift like your back, glutes, and forearms.
Improving Deadlift Performance
The upper portion of the deadlift movement – the lockout – is a challenge for many weightlifters. The rack pull can boost conventional deadlift performance by strengthening the muscles involved in this part of the lift and making the exercise more efficient for the back muscles.
Less Strain on the Lower Back
A conventional deadlift places a large amount of compressive and shearing forces on the vertebrae of the lower back, which increases the risk of injury. Are rack pulls safer than deadlifts? Well, a rack pull’s elevated starting position places significantly less tension on the lower back, reducing the risk of injury.
Promotes Growth in Your Training
By adding rack pulls into your workout plan, you can change up your routine, which challenges your body and can help prevent plateaus in your deadlift training.
Alternative for People with Mobility Issues
One of the benefits of rack pulls vs deadlifts is that, because they don’t require you to bend over as far as other deadlift variations, they’re a great alternative for people who struggle to lift the weight off the floor or are recovering from injury.
Drawbacks of Doing Rack Pulls
Are rack pulls harder than deadlifts? Not necessarily, but they do have their own disadvantages.
Requires More Equipment
Performing rack pulls correctly requires a power rack with safety pins, which not all gyms have – and if they do, they may not be available for you to use when it’s time for your deadlifts. Unfortunately, that means they’re not great for home workouts.
Risk of Injury
Because rack pulls allow you to lift heavier weights, there’s as much or more risk that something can go wrong if you don't use the correct technique. A wise person once said, “Just because you can, doesn’t mean you should.” Avoid jumping to heavier weights; instead, gradually increase your lifting weight and combine the rack pulls with other movements that complement your activated muscles.
Less Functional, Less Carryover
Since the movement starts from knee-height, rack pulls don’t target the entire posterior chain as comprehensively as deadlifts. This means it doesn’t carry over as well to other exercises or real-life, where we often have to lift heavy things from the floor.
Deadlifts: What are they?
Deadlifts are a fundamental weightlifting exercise known for their effectiveness in building overall strength and power. It's one of powerlifting’s three competitive lifts, with the squat and bench press.
The conventional deadlift involves lifting a barbell from the ground to a standing position, using leg strength and maintaining a straight lower back to safely lift heavy weights.
Historically, the deadlift was known as the "health lift" due to its extensive benefits. It’s an incredibly effective full-body exercise that generates a large amount of power and increases muscle gains and strength across a host of muscles.
Muscles Worked in a Deadlift
Deadlifts are a comprehensive compound exercise, engaging multiple muscle groups by requiring movement across several joints – more than a rack pull (that’s a point for deadlifts in the deadlifts vs rack pulls debate). Depending on the lifter's body composition, the recruitment of these muscles can vary.
The primary muscles activated during a deadlift include:
Upper legs
Unlike the rack pull, deadlifts require significant work from the quadriceps due to the knee extension as you lift the weight off the floor. The glutes and hamstrings extend the hip during the lifting phase of the deadlift. The adductor magnus (which runs along the inner thigh) helps stabilize the legs and hips.
Core
The core stabilizes the body and protects the spine throughout the movement, which is essential for both performance and safety.
Lower Back
The spinal erectors maintain a straight back during the lift, preventing rounding that can lead to injury. Lifters with longer legs might find themselves starting the deadlift with a more horizontal back position, thereby engaging the spinal erectors and glutes more intensively.
Calves
While not the primary focus of the exercise, the calf muscles (gastrocnemius and soleus) stabilize the legs and aid in the lift.
Upper Back
The latissimus dorsi, deltoids, and, in particular, the traps and rhomboids work together to keep the bar close to the body, stabilize the torso, and support the lift.
Arms
The gripping muscles of the forearms engage to hold onto the barbell. The biceps and triceps contribute through isometric tension to assist in stabilizing the lift.
How to Do a Deadlift Correctly
Like the rack pull, a deadlift consists of three parts — setup, drive, and lockout — and executing each with proper form can help prevent injuries.
Here's a comprehensive guide to mastering the deadlift, ensuring you reap all its benefits safely and effectively:
The Setup
- Begin with your feet shoulder-width apart, the barbell placed on the floor directly in front of you.
- Ensure the bar is over the middle of your feet, close enough that your shins are near the bar without touching.
- Hinge at the hips, bend your knees and lower your upper body towards the bar without curving your spine.
- Grasp the bar with hands shoulder-width apart, opting for either an overhand grip or a mixed grip for better grip strength.
- Your shoulders should either be slightly in front of the bar or directly over it.
The Drive
- Take a deep, diaphragmatic breath to brace your core.
- Push through your heels, extend your knees and hips, and lift your chest and arms to lift the bar.
- Move your hips and shoulders in unison, keeping the bar close to your body to minimize back strain.
- Keep your arms straight and tense as you lift, thinking of them as straps that connect your shoulders to the bar.
- As you lift, the bar should travel in a straight vertical line, ideally grazing your shins to reduce imbalance.
- Maintain a neutral neck position by focusing on a point on the ground a few feet in front of you to align your head and spine.
The Lockout
- Extend your hips and knees until you reach a fully upright position, with the bar just in front of your thighs.
- Squeeze your glutes to ensure full hip extension and stability in the lockout position, with your body in a straight line from head to heels, shoulders pulled back, and the bar held firmly in your grip.
- Reversing the motion, lower the bar to the ground by bending at the hips, pushing your buttocks back while keeping the bar close to your body.
- Once the bar passes your knees, bend your knees to lower the bar all the way down to the floor.
- Keep your back straight and core engaged throughout the descent to avoid rounding your back.
- Place the barbell gently on the floor in the same position it started in, ready for the next lift.
Common Deadlift Mistakes
Here’s a rundown of common mistakes that can hamper your deadlift performance and increase the risk of injury.
Rounding the Back
Perhaps the most common and risky mistake is rounding the back. Both the lower and upper back should remain in a neutral position throughout the deadlift to avoid compressive forces on the spinal discs. Focus on tightening your core and keeping your chest up from setup to lockout.
Not Maintaining Bar Contact
Starting with the bar too far from your shins or allowing the bar to drift away from your legs can put unnecessary strain on your lower back. Aim to keep the bar in contact with your legs as much as possible.
Starting with Hips Too Low or High
Starting with hips too low can mimic a squat, diminishing the role of the posterior chain, while starting with hips too high shifts undue stress to the lower back. Your hips should start in a position that allows your shoulders to stay slightly in front of the bar.
Skipping the Hip Hinge
The deadlift is fundamentally a hip-hinge movement, yet many lifters turn it into a squat by bending too much at the knees and not enough at the hips. Ensure you hinge at your hips while maintaining a slight bend in the knees during the setup.
Over-Pulling at the Top
At the culmination of the lift, there’s a temptation to lean back, which places unnecessary stress on the lower back. Instead, focus on simply standing tall with your shoulders back and hips locked out.
Not Loading the Hamstrings
Before the lift, push your hips back to stretch and load your hamstrings, like pulling back a bowstring, releasing the energy as you begin the lift.
Rushing the Setup
Not taking enough time to correctly set up for each rep can lead to inconsistent technique and increased injury risk. Take your time to ensure your feet, hips, and shoulders are properly aligned and the bar is in the correct position before each lift.
Benefits of Deadlifts vs Rack Pulls
Deadlifts offer a multitude of advantages for those who incorporate them into their fitness routines. Are rack pulls better than deadlifts? This next section has your answer.
Full-Body Strength
The deadlift is the ultimate compound exercise. It targets nearly every major muscle group, including the glutes, hamstrings, back, abdominals, and forearms. This broad activation makes deadlifts incredibly efficient for building overall body strength.
Enhanced Functional Fitness
Mimicking everyday movements like bending and lifting, deadlifts improve your functional strength, which can ease daily tasks and reduce the risk of injury during physical activities. This is especially important for older people.
Increased Bone Density
Deadlifts are weight-bearing exercises that stress the bones in a healthy way, stimulating increases in bone density. This is particularly beneficial for aging adults, helping to mitigate the risk of osteoporosis.
Increased Metabolism
Because they engage so many muscles, deadlifts are also great for calorie burning, both during and after workouts, thereby supporting weight management and metabolic health.
Rehabilitation and Prevention
Deadlifts can be an effective part of rehabilitation programs for lower limb injuries, providing a safe way to rebuild strength and stability. Additionally, they can help prevent future injuries by enhancing overall musculoskeletal resilience.
Drawbacks of Doing Deadlifts
Despite their benefits, deadlifts come with potential drawbacks, primarily related to the technical complexity and physical demands of the exercise.
High Injury Risk
Improper technique, especially with heavier weights, significantly increases the risk of injury. Common injuries include strains and sprains, particularly in the lower back and hamstrings.
Technical Complexity
Deadlifts require careful attention to form and technique to be executed safely and effectively. This can make them daunting for beginners, who must invest time in learning and practicing the movement before fully reaping its benefits.
Intensive CNS Demand
The comprehensive muscle activation involved in deadlifts places a substantial load on the central nervous system (CNS). Overdoing it without adequate recovery can lead to fatigue and decreased performance.
Mobility Requirements
Deadlifts demand a good range of motion, particularly in the hips and hamstrings. Individuals with mobility issues may find them challenging, increasing the risk of compensatory movements and injury. It’s a good idea to test your range of motion before trying a difficult exercise like a deadlift.
Rack Pulls vs Deadlifts: What are the key differences?
Rack pulls vs deadlifts share substantial common ground:
Both exercises are hip-hinge movements focusing on engaging the posterior chain; both engage the lats, traps, and forearms, and both require core stability. However, the difference in the range of motion and starting position make them profoundly different exercises. Here are the critical differences:
Starting Position and ROM
Deadlifts commence with the barbell on the ground, demanding a full-body engagement right from the initial pull. Rack pulls, however, begin with the barbell elevated on safety arms or blocks, typically just below the knee.
Muscle Group Focus
The limited ROM in rack pulls shifts the primary focus towards the upper body, particularly the upper back and traps, while the deadlift’s full ROM requires extensive work from the lower back, glutes, and hamstrings.
Weight Capacity
The shortened ROM in rack pulls often allows lifters to handle heavier weights compared to conventional deadlifts, due to the mechanical advantage gained from the starting position.
Functional Strength vs Hypertrophy
Deadlifts are renowned for their ability to build functional strength, mimicking real-life movements like picking up objects from the ground. Rack pulls are better suited for targeted muscle hypertrophy, especially in the upper back.
Difficulty Level
Generally, deadlifts are considered more challenging due to their technical complexity and the full-body coordination required.
Deadlift or Rack Pull: Which option is the right fit for you?
So, which is better: deadlifts or rack pulls? Unfortunately, it’s not that easy. You need to consider your specific goals, physical condition, and whether you're participating in specific sports or competitions.
Powerlifters: Deadlift
Want to do powerlifting or strongman competitions? Mastering the deadlift is essential. It's a staple movement in these sports. In this battle, deadlift vs rack pull? Deadlift all the way.
Athletes: Deadlift
For athletes whose sports benefit from explosive power and jumping ability, the deadlift may offer more direct performance enhancements due to its extensive lower body and posterior chain engagement.
Beginners: Rack Pulls
Rack pulls require less technical skill and flexibility than deadlifts, making them accessible to a broader range of fitness enthusiasts, so this round of rack pulls vs deadlifts is won by rack pulls. Use rack pulls to build up strength and familiarity with the pulling movement, gradually lowering the starting height of the bar to perform full deadlifts from the floor.
Getting Big: Rack Pulls
Those aiming primarily to increase muscle mass, particularly in the upper back, might find rack pulls more beneficial. Rack pulls allow for heavier lifting with a focus on the back muscles, potentially reducing overall fatigue compared to full deadlifts.
Injury Rehabilitation or Prevention: Rack Pulls
If you’re deciding between either deadlift or rack pull for your next workout, individuals with lower back concerns or in rehabilitation might opt for rack pulls due to the reduced lower back strain from the elevated starting position.
Functional Strength: Deadlifts
Deadlifts excel in building functional strength that translates to everyday activities and athletic performance due to their complete range of motion and similarity to natural lifting tasks. This round of rack pulls vs deadlift goes to deadlifts.
Targeted Hypertrophy: Rack Pulls
Rack pulls can be more effective for isolating and overloading the upper back muscles, offering a pathway to specific hypertrophy goals. So, rack pulls or deadlifts? Rack pulls win this one.
Safety and Accessibility: Rack Pulls
While both exercises can be performed safely with proper technique, rack pulls offer a safer alternative for strengthening the upper back with less risk. Are rack pulls safer than deadlifts? The answer is “Probably,” but there’s risk involved with both.
Making the Choice
Ultimately, the decision between deadlifts and rack pulls should reflect your personal fitness objectives, current physical condition, and any specific training requirements for sports or rehabilitation. Deadlifts are unparalleled for building foundational strength and enhancing functional performance. Conversely, for focused upper back development and when navigating back health considerations, rack pulls offer a valuable alternative.
Consider the unique benefits of rack pulls vs deadlifts, then integrate both exercises into your routine at different times for a balanced approach that significantly transforms your fitness. There are also other PROM deadlift variations you could consider integrating into your workouts – like the trap bar deadlift vs deadlift.
Whether you're an athlete, powerlifter, or someone looking to improve your overall strength and physique, you can make the most of the latest in AI technology and fitness science with Zing Coach, the digital personal trainer of the future. Download Zing Coach today to get a workout plan tailored to your needs and discover all the tools you need to reach the fitness goals you once thought were impossible.
FAQ
Tags
Share this article
Authors
Medically reviewed
Walter GjergjaShaolin Master, Sports Master, former professional athlete, training advisor to Olympic and World Champion athletes, wellness and performance author.
![Deciding to Squat or Deadlift First [Training Choices]](https://www.zing.coach/library/squat-or-deadlift-first-preview.jpg)
![Clean and Press vs Clean and Jerk Guide [Lift Breakdown]](https://www.zing.coach/library/clean-and-press-vs-clean-and-jerk-preview.jpg)
![High Rep Deadlifts for Growth [Increase Strength & Stamina]](https://www.zing.coach/library/high-rep-deadlifts-preview.jpg)
![Trap Bar Deadlift vs Squat Comparison [Choosing Your Move]](https://www.zing.coach/library/trap-bar-deadlift-vs-squat-preview.jpg)
![Guide to Behind-the-Back Deadlifts [Technique & Benefits]](https://www.zing.coach/library/behind-the-back-deadlift-preview.webp)
![The Front Squat Hand Position Basics [Optimize Form]](https://www.zing.coach/library/the-front-squat-hand-position-basics-optimize-form-preview.png)
![Best Deadlift Accessories Reviewed [Boost Your Lift]](https://www.zing.coach/library/deadlift-accessories-preview.jpg)
![Mastering the Pause Deadlift [Elevate Your Training]](https://www.zing.coach/library/pause-deadlift-preview.jpg)
![Optimizing the Deficit Sumo Deadlift [Enhance Technique]](https://www.zing.coach/library/deficit-sumo-deadlift-preview.png)